Materials Needed:
Clothesline or other cording
Fabric Strips (approximately 1/2" - 3/4" wide, any length)
Two clips (binder, clothespin, Wonder clip)
Sewing machine with zig zag stitch
Once I found out how to construct the bowl using my sewing machine, I started collecting clothesline. Cotton is the best, but the polyester stuff works too. You can buy macrame cording or other types of cording as well. Check your craft or fabric store for options. Clothesline can be hard to find, but now I see it everywhere. Your hardware store should have it if you get desperate.
My basket of strips. Most of these are selvage edges that don't have the color dots or writing. I collect and use those for other projects. I have one bag under my cutting table for strips and I store the the selvages with color dots in a different place. I dumped the bag of strips into a laundry basket so I could pick and choose colors. You could also cut strips from fabric in specific colors. Longer strips are a little harder to work with, and you don't want anything wider than an inch. No need to measure, but 1/2" to 3/4" wide works best. Wider strips are harder to wrap around the cording. The wider strips tend to bunch up.
The polyester cording unravels, so I usually melt the raw end with a scorpion lighter to reduce bulk at the end. Scorpion lighter optional.
A few of my sources suggest cutting your first fabric strip at an angle and gluing it in place. It doesn't have to look perfect, you will never notice it in the final piece. Gluing is optional, you can just cover the end of the cording with the fabric strip and start wrapping it around the cord. Continue wrapping the fabric strip around the cording covering all the cording and secure the fabric strip end with a binder clip, clothespin, or Wonder clip. Now it's time to sew!
Tightly coil the cording and set your sewing machine to sew a zigzag stitch. If you have a needle down mode, set that. I make the zigzag stitch width a little wider than the normal setting. You can play around with it and see what works. The zigzag stitch is stitched to catch both sides of the cording, so adjust as needed. The beginning is a little hard, but after a couple of times around, it gets much easier and faster. Continue stitching and turning/coiling your cording. When you get close to the end of the fabric strip, add another and secure with a clip.
When adding a new strip, cover the tail end of the previous strip with the new strip. Hold everything together with a clip so nothing unravels. Make sure you leave yourself enough cording to add a new strip. I was cutting it close in the photo above. The coil stays under the presser foot the entire time. This is where having a needle down mode comes in handy.
Keep going until the base of the bowl or tray is the size you want. You will keep the coil flat as you stitch. You can kind of see the white thread zigzags and how they catch two rows of cording. Use coordinating thread for less contrast. I'm not sure any thread would have coordinated with my multiple colors and that clear thread always fails me. I have a wad of it in my thread drawer.
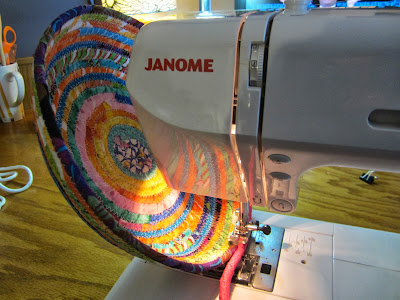
To make the bowl shape you simply start tilting the coil toward your needle. Keep the angle consistent for several turns around the bowl and then start tilting the bowl toward your machine to build the sides. For a bowl shaped like the one I made, make subtle tilts toward your machine as you add more fabric-covered cording.
Toward the end of my bowl, I've tilted the bowl at almost a 90 degree angle to get the sides of the bowl higher. You could make shorter sides to form a tray, or higher sides to get a deeper bowl.
How to make a coiled fabric bowl.
Handled fabric bowl.
Fabric coil coasters using hot glue.
This one uses 1/2" cording and is hand sewn.
If you need more inspiration, here's a collection of images of coiled baskets.


Pretty cool, Michele!
ReplyDeleteHoly COW! Love these bowls. Going on my tutes page
ReplyDeleteThanks for the nice instructions--added to my tutorials too! Your scrappy bowl is very pretty! I definitely want to make one (or more) now!
ReplyDeleteNever thought I would enjoy doing these, but your tute makes it look like I will. I now have to try it. Thanks!
ReplyDeleteYou make it look so easy!!!! Now I'm glad I've been saving all those selvages without the writing as well..
ReplyDeleteAre you still going to do a demo at a quilt meeting, I like that.
ReplyDeleteAre you still going to do a demo at a quilt meeting, I like that.
ReplyDelete